Sunday, November 29, 2015

Thanksgiving leftovers

Happy belated Thanksgiving all!  Yes, I was very busy cooking, preparing and serving up the family all the traditional holiday fare at our house.  This year we had 2 thanksgivings one on the traditional day and then the second on Saturday when our son and his wife were able to drive up for a visit and a meal.

Every year, my family expects to find on the table, their daddy's baked turkey (baked in a bag) and all the fine sides their mom (me!)can come up with.  Usually, that means the "Yankee dressing" as the kids like to call it, the "green salad" also deemed by the family years ago, pumpkin bread and pecan pie.  This year all our kids came from other places where they live...dorms and homes, so with all the leftovers and just the two of us, I got to thinking about what to do with the turkey, sausage, and ham............

Turkey Rice soup

3 stalks of celery, minced
1 onion, chopped/minced
1 small carrot, chopped/minced
1 tsp, minced garlic
1/2 of a large green pepper, minced
1/3 c    Olive oil
1 cup of spiced sausage
4 slices of bacon, cooked and diced

In a large stew pot, cook all the ingredients until tender, 10 minutes.
Then add:

5 cups of turkey stock
4 cups of water
1 14.5 oz can of diced tomatoes
1 Tbsp  parsley flakes
1-2 Bay leaves
1/4 cup Worcestershire sauce
Turkey meat from the Thanksgiving Bird

Stir and heat to boiling, stirring periodically.
Then add:
1.5 cups of uncooked rice

Cook at a low boil for 25 minutes, or until the rice is completely tender.

Well, it was delicious and I learned something along the way, homemade worcestershire sauce...I'm still working on the recipe, so I'' post it when it's ready for publication.

Thankfully!


Friday, November 13, 2015

Thursday night throw together

Last night I worked all day and was hungry for something different.  My husband was coming down with a cold and I knew a good hearty dinner was in order.   Getting in the door before my husband, I dropped my purse, and hit the kitchen with hardly a plan, but that is me...."A cook on the fly"!!

Looking in the fridge, I realized that I had some cabbage and celery that needed to be used asap.  I got out a couple of pieces of chicken and chopped up the red cabbage which was just a quarter of a head and 2 stalks of celery, and one small onion and put them all in my deep frying pan.  I really like the chicken stock in paste form from Sam's club and made 1.5 cups of stock with it.  Poured some olive oil in the pan first and let it heat up.  After it started to steam, I added the stock, salt, a dash of sugar (for the cabbage) and pepper and garlic powder then put the lid on it.

Note:  did you know that the leaves of the celery are delicious and make the dish that much more flavorful??  Oh yea!

Anyway, the chicken dish was cooking along and I knew I had to get some sides and a starch for my honey, so I got out some Brussels sprouts that were frozen and put a stick of unsalted butter in the pan and after it melted, put the Brussels sprouts in and let them steam on low heat.  Cousus is a great and quick side that provides starch and flavor if you do it right.  I always add garlic and butter and some chicken stock while it cooks.

Looking back at the chicken and cabbage cooking, I realized that the whole dish had turned purple, including the chicken!  Well, the show must go on and as my better half walked in the door exhausted and sick, I had a warm meal provided for him.

It turned out to be very VERY good!!  The chicken was well cooked and moist simmering in the cabbage, and stock, and the couscous was the perfect foundation for the dish.  I finished the meal with grating some cheddar cheese on the tender Brussel sprouts and serving them with some bread crumbs as a topping.

Voila!  a meal on the fly!!

Friday, October 23, 2015

Mexican Chilli: Taco meat has a second life!!

Left overs they can be so annoying or so amazing depending on what you can think up to do with them!  A few days ago, I made some tacos and since it's just the two of us for the most part, we had leftover meat.  Last night I was starving coming home from work and I thought about something with corn, lots of flavor, and beefy....voila!  I got home and before I even changed out of my work clothes, I got to work on my creation.  First I got out a deep frying pan and sauteed some onions in a bit of vegetable oil, then when they were transparent, I added the corn, black beans, diced tomatoes, and leftover taco meat.  With everything in the pot, I just let it simmer for about 30 minutes.  Oh, I added another Tbsp of my taco seasoning to give all the beans, corn, and tomatoes some flavor, there wasn't enough seasoning in the taco meat to give the entire product good hearty flavor.  When my husband came home, he was hit with the smells of a delicious mexican chilli!   

Here's the recipe:

Mexican Chili
Half of a medium onion, diced
1 Tbsp, vegetable oil or unsalted butter
1 can, undrained black beans, (American's Test Kitchen recommends Goya beans)
1 can of whole kernal corn, drained
1 can of diced tomatoes, drained...slightly
1/2 lbs of Taco meat  ( I prepare mine with my own taco seasoning)
1 - 2 Tbsp of taco seasoning

Directions
Saute onion in oil until transparent, add the remaining ingredients and let simmer for 30 minutes.

Serve hot and enjoy!

Thursday, October 1, 2015

Blackbean Soup

Oh! What a warm bowl of black bean soup does to the soul of a southerner...even one at heart!  This evening as the rain continues to saturate our county with hurricane Joaquin threatening the east coastal communities, I got home before my husband and cooked up a big pot of soup.  I had some leftover couscous that I made a few nights ago, so with shredded cheese and Greek yogurt, we had a fulfilling meal, the two of us.

As with many soups, this one called for chicken stock which I have plenty of homemade stock made from the rotisserie chickens we get from Sam's club periodically.  See the recipe here. All it took from start to finish was about 30 minutes, so it is a quick, hot, and flavorful meal for any workweek evening!  Here's the recipe:

 Black Bean Soup

2 -14 oz cans of black beans, rinsed and drained
1 small onion, diced
2 cloves of garlic, minced
2 Tbsp Olive oil
1 tsp ground cumin
1 tsp ground pepper
3 cups, chicken stock, (I use my own homemade)
1 can dices tomatoes
Hot sauce, optional

In a large pot, sweat the onions and garlic in olive oil until they are transparent.  Add the drained beans, tomatoes, and stock following with cumin, pepper and optional hot sauce.  Allow the soup to boil for about 5 minutes, then reduce and let simmer for 20 minutes.  Remove the pot from the heat and with an immersion blender, lightly blend the soup just until it begins to look smooth with bits of tomatoes and beans still remaining.  Ladle into bowls and top with sour cream (we use Greek yogurt) and shredded cheese.

For the final ending to our meal, my husband topped chocolate chocolate chip ice cream with a dollup of whipped cream and a spritz of Amaretto!  YUM!!!


Monday, June 22, 2015

Blueberries!

 About five years ago, a friend gave my husband a couple of blueberry bushes and said fertilize them well and you will have blueberries in a few years.  We planted them, did the research on how to feed and water them, and even where in the yard to best plant them.  They didn't do a thing the first 2 years, but viola! last year we had a bumper crop!!  We netted them properly the third year when we discovered little berries, but waited too late and the birds got the most of them.   Last year we really put an effort in making sure we got the most of them and bough bird netting and covered them very well.


They are absolutely beautiful!  Big and plump and oh so sweet!  So after you get about 2 pints (4 cups) of blueberries you can start putting them up as they say in the canning/preserving world.

This year, instead of starting with jam, I decided to freeze some to have during the year and then make some jam later in the season.  Southern Living magazine is my go-to magazine for lots of recipes and in the May 2013 issue (I never throw them away!) in the "Test Kitchen" section in the back, they covered "Preserve the season's Harvest".  I am going to show you the Syrup Pack version.  The article says that the berries are like fresh picked after you thaw them in the
fridge.   So here goes!

The first step is to lightly rinse the berries and check for stems, leaves, bad berries, and drain them. 

Pack them in cleaned and sterilized wide-mouthed jars.    I sterilize my jars in the microwave for 30 seconds after cleaning them well with hot water.

Make the syrup:  It's 4 cups of cold water and 2 1/2 cups of sugar mixed together until the sugar is completely dissolved.  (See above)

Then pour the syrup into each jar over the berries saving a half inch for expansion during the freezing process.
 
Wipe clean the rim and place the cap on tightly. 

The don't forget to label your jars and place them in the freezer.   Freeze for up to 12 months.

When you want to use the frozen berries, just thaw them in the refrigerator overnight and voila!

Blueberries from our very own backyard, how nice is that??


Here's the recipe in short:

Freezer Blueberries
4 quart of cold water
2.5 cups of sugar
4 cups of freshly picked blueberries
4 wide-mouth canning jars with lids

Mix the sugar and water together until the sugar is completely dissolved.  Wash the berries gently and pick out stems, leaves, etc.   Wash and sanitize the jars and lids.  Pack blueberries in each jar, pour the syrup over the berries up to a half inch from the top. Wipe each rim with a damp clean cloth and seal with lid.  Freeze up to 12 months.   Thaw in fridge overnight to use as fresh berries.

Saturday, April 18, 2015

Orange Marmalade from scratch....and what I learned

My husband loves all things tart, bitter, and peppery.  Tart is a flavor I know I'll win his approval no matter what it is, so when I decided to try MY hand at orange marmalade, HE couldn't wait to get started!


Notice the broken jar...I hate when that happens.  Basically what causes the jar to crack in the canning process is too much room to move around in....make sure your jars are snug, so that they can't move around and break in the canning process....what a mess!!

Anyway, the big lesson I learned after this process is for next time, chop the oranges up into smaller pieces so they are easier to spread on toast, crackers, and bagels.   As it is now, each jar has to be dumped and chopped or he just chops up the jar as he eats the marmalade.

Here's the recipe:  this is from Ina Garten's recipe from Foodnetwork.com

4 large seedless oranges
2 lemons
8 cups sugar

Step 1
Cut the oranges and lemons in half crosswise, then into very thin half-moon slices.  Discard any seeds. Place the sliced fruit and their juices into a stainless-steel pot. Add 8 cups water and bring the mixture to a boil, stirring often. Remove from the heat and stir in the sugar until it dissolves. Cover and allow to stand overnight at room temperature.

Step 2
The next day, bring the mixture back to a boil. Reduce the heat to low and simmer uncovered for about 2 hours. Turn the heat up to medium and boil gently, stirring often, for another 30 minutes.  Cook the marmalade until it reaches 220 degrees F on a candy thermometer. If you want to be doubly sure it's ready, place a small amount on a plate and refrigerate it until it's cool but not cold. If it's firm -- neither runny nor too hard -- it's done. It will be a golden orange color. (If the marmalade is runny, continue cooking it and if it's too hard, add more water.)

Pour the marmalade into clean, hot Mason jars; wipe the rims thoroughly with a clean damp paper towel, and seal with the lids. Store in the pantry for up to a year.

Read more at: http://www.foodnetwork.com/recipes/ina-garten/annas-orange-marmalade-recipe.html?oc=linkback

Saturday, April 4, 2015

Angel Food Cake

Room temperature eggs
There are two special occasions that I make this amazingly luscious cake;  Easter Sunday and my husband's birthday.  I actually think if I made it more often, no one would complain! 

Some people find this cake to be a challenge too great to take on, but alas, I am here to tell you that with only a few different techniques strange to your normal everyday cake, anyone can be successful with their very own Angel Food cake.  Seriously!

 The first thing that everyone should know by now, is that your eggs need to be room temperature for best results. Hence my bowl of eggs at the top of the post.

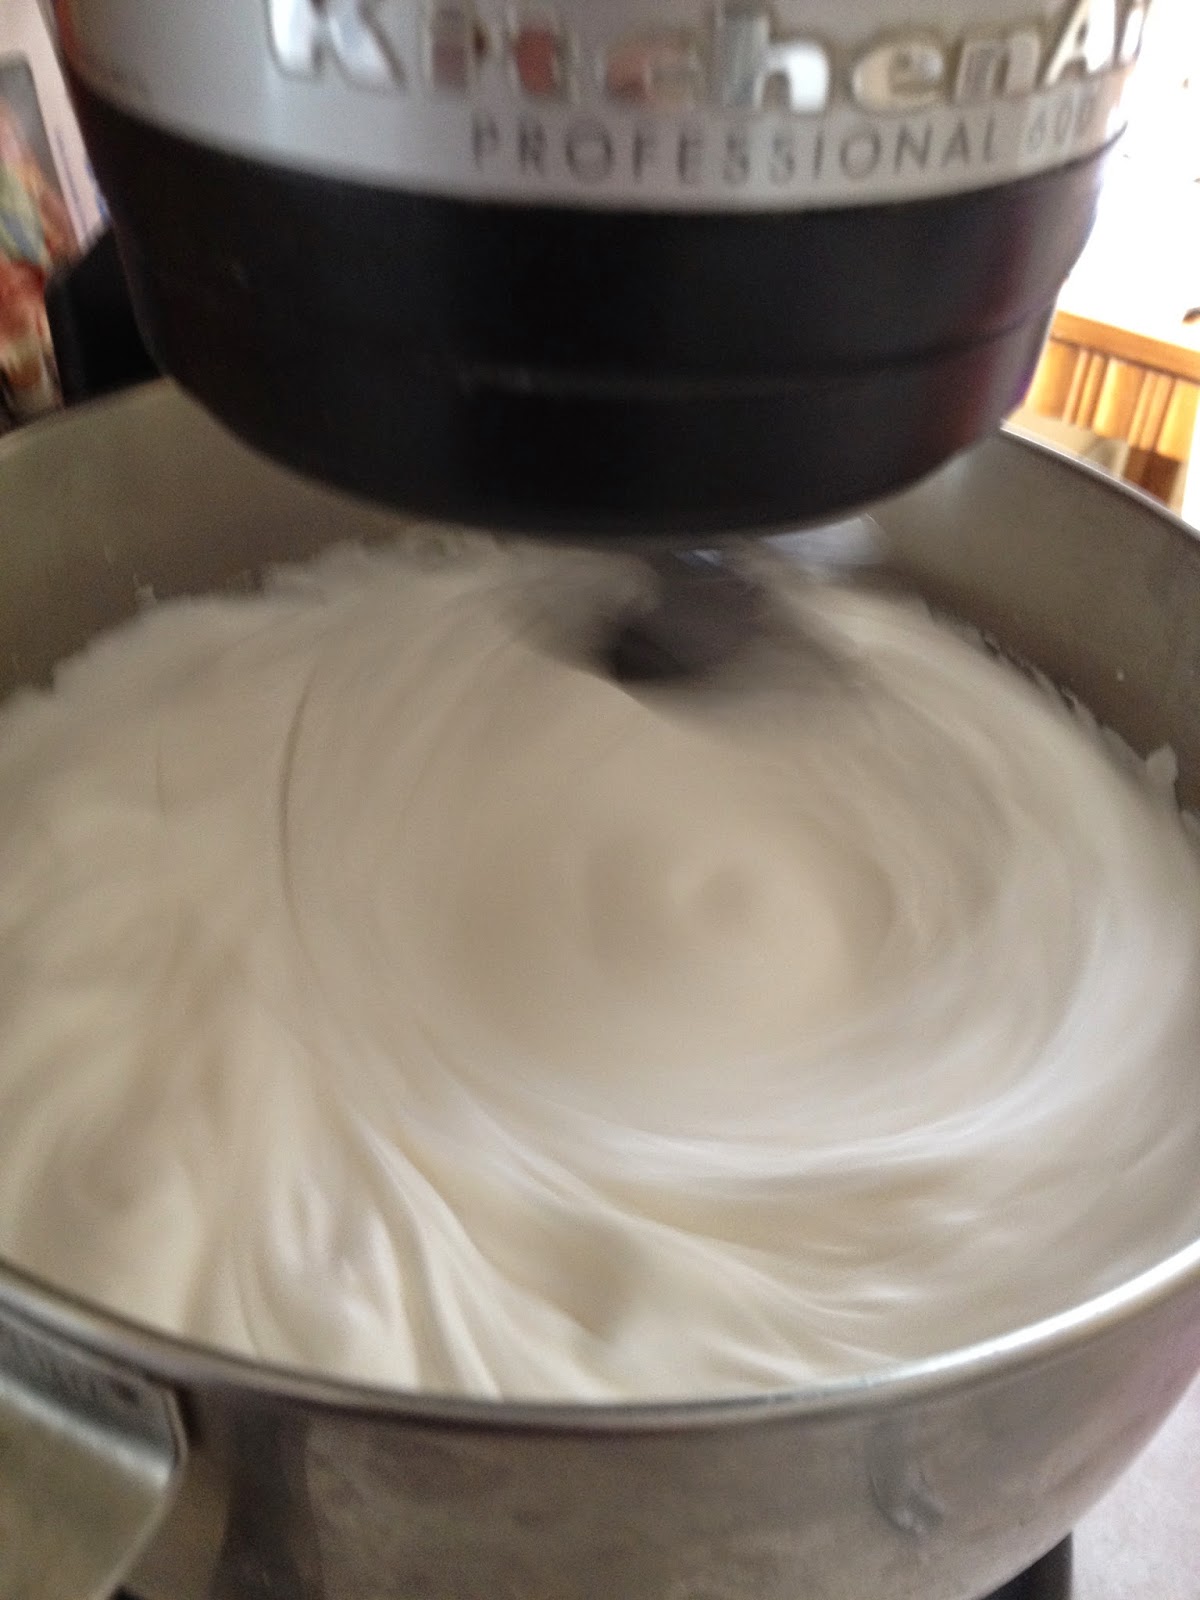
The hardest part of this cake, in my opinion, is the separation of the 12 eggs, one slip of yoke in the whites and you will not get fluffy meringue for the batter. 

While the egg whites, salt, cream of tartar and flavorings are beating, AND before adding the sugar, sift the 1 cup of cake flour (1 cup all purpose minus 2 Tbsp) and 1 1/4 cup of confectioner sugar together a couple of times. Now with most flours packaged already sifted, most recipes can skip this step, but not angel food cake!

After the meringue starts to thicken up and form soft peaks, begin adding the sugar slowly for complete incorporation.

When the meringue forms stiff peaks, it's ready for have the flour/sugar mixture folded in.  Take 1/4 cup of the flour mixture at a time and fold slowly into the meringue until there is no sign of flour in the batter.
This step is a bit tedious with the amount batter, but persevere you must!

Now, once all the flour in completely incorporated, you are ready to get the pan ready.

Remove the pan from the cupboard and place it on the counter.  STOP,  that's all you do!!

 Pour the batter in the UN-greased evenly and run a sharp knife through the batter to make sure all the air bubbles are out.  See the picture on the right, here.

Bake the cake in a 375 degree oven for 30 - 35 minutes depending on your oven.  The cake will crinkle on the top and turn nicely golden brown and when you touch it, it will feel soft, but not indent.

Now is a weird thing that you do for all angel food cakes, you set it upside down on the counter....do you notice on an angel food cake pan these leg-like things on the side?   Well these are the legs that will balance the pan on the counter while the cake cools.  Weird, eh?


Now when the cake pan on the outside is cooled, the cake is ready to be plated.  Run a sharp knife around the outer edge of the cake and around the center tube of the pan.  Then push from the bottom of the pan to release the cake from the pan and run the knife around the bottom part of the pan for release it from the bottom/tube part.  For best results,place the cake plate over the cake and flip it over onto the cake plate so that the bottom of the cake becomes the top and will look like this!!   Very pretty and almost perfect in shape.   Hope that wasn't too confusing!


 The ingredients are as follows:
1 cup of Cake Flour
1-1/4 cup of confectioners sugar
1 cup of granulated sugar
1/4 tsp salt
1-1/2 tsp cream of tartar
1 tbsp  Vanilla
1 tsp Almond extract


Please make this fine confection, you will be amazed at how rewarding it is to master and enjoy an Angel Food Cake on any special occasion!

Wednesday, March 11, 2015

Inspiration and creation!

Watching Food network is my vice every afternoon after work.  As usual, I didn't know what I was making for dinner, but Ina and Ree helped with that!!  Both ladies made a dish with pasta and a type of white sauce (Bechemel anyone!), broccoli or tomatoes and chicken.  Well, that was all I needed.  Here's what I did:


4 Chicken fillets, pan fried with onion and olive oil, salt/pepper
My bechemel sauce:
2 Tbsp of unsalted butter
2 Tbsp of all purpose flour
1.1/4 cup warmed whole milk
Salt/pepper
3/4 cup Parmesan Cheese
1 can of diced tomatoes, DRAINED
1 box of Penne pasta


Pan fry the chicken tenders in olive oil and slices of onion till browned.

Bechemel sauce:
Melt butter in medium size sauce pan, meanwhile, heat milk in microwave for 1.5 minutes. Whisk in the flour and cook for a minute (while the milk is warming in microwave).  Add the milk, salt/pepper and a dash of nutmeg (traditional in bechemel sauce).   Whisk until thickened, then add the Parmesan cheese til completely combined.  finally, add the tomatoes.  Mix all together and toss in the penne pasta to combine.

As side dishes go, my family loves my stir-fried broccoli and a sweet bread, pumpkin or banana.


Sunday, March 1, 2015

Fast and fabulous meatloaf!

Meatloaf, you either love it or it gives you heartburn, right?  I've had meatloaf that came way too dense or way too soggy and/or falling apart and then it is more of a sandwich filling than a stand alone entree.  Recently, our family went to a popular BBQ restaurant statewide and our eldest daughter's fiance ordered meatloaf (frankly, why does one order meatloaf at a famous BBQ eatery!!??) and when it arrived, I couldn't believe my eyes.  The meat product, named meatloaf by this establishment, was the densest, bready, and most hideous looking mess I had ever seen.  Why the edges even heavily resembled a crust!!  I asked for a sample of which our to-be son-in-law happily obliged, it was dry and exactly what I suspected, bready.  YUCK!  He didn't complain and ate it with gusto, but as he is one of eight in his family, food from a restaurant is a treat.

My mom made meatloaf probably once a month and we all enjoyed it, my dad loved the chow-chow that she made on it.  He was solo with that, we kids put ketchup on ours, oh yeah!  Together with mashed or scalloped potatoes and peas, we were set on a nice meal.  Fast film forward to today, I don't make meatloaf as often as my mom, but I should.  The traditional recipe called for ketchup, cracker crumbs, 2 eggs, diced onions and salt/pepper to taste, but some years ago when my children were babies and time was short for preparing meals, I got lazy and just poured salsa in the meat and cracker mixture and called it a day. Figuring that the onions, tomato sauce, and other seasonings were already combined in the salsa, it would be a great short cut,and it was.  It was fabulous!

So here is my recipe for fast and fabulous meatloaf!

2 lbs of ground beef
2 large eggs
1 - 1.5 cups salsa
1 cup of breadcrumbs or butter flavored cracker crumbs
salt and pepper
Bacon, optional, but DELICIOUS

Mix everything together completely, except the bacon.  Put meat mixture in a loaf pan, or form it in a loaf shape and place it on a cookie sheet with all four sides (keeping the grease from ruining your oven)  Wrap the uncooked bacon over the top of the meatloaf to cover.  Bake for at least an hour or until the center temperature reaches 180 degrees for beef.  Let the loaf rest under some foil while you get the rest of the  meal together and serve.

This recipe has been my staple for about 15 years now with no complaints, if you try it, let me know how you and your family liked it!

Blessings!